
DIY Autumn Wreath
- Oct 19, 2025
- 2 min read
Updated: Oct 20, 2025


🍂 DIY Autumn Wreath on a Budget
Today I’ve been getting my front door ready for autumn and I couldn’t be happier with how my new wreath turned out!
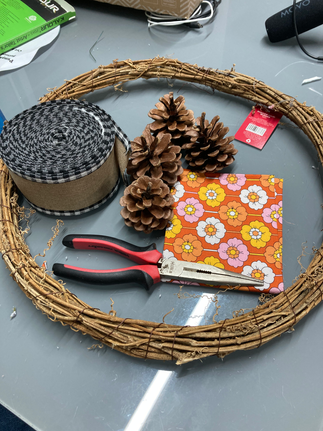
I didn’t want to spend a fortune on bespoke autumn floristry supplies (especially after seeing the prices in some shops!), so I decided to get creative with what I already had.
I started by digging through my Christmas craft supplies box and found some faux berries. They were bright red, so I gave them a fresh new look by painting them a lovely warm orange with acrylic paint, the perfect autumnal touch without spending a penny.
Next, I used some gorgeous retro-patterned orange fabric fat quarters I picked up recently in Hobbycraft. They were an absolute bargain ,just £5 for a stack of six, instead of the usual £9.50!
Rather than tearing the fabric, I stitched the pieces together to form little tubes, then added slip-gathering stitches along the top and bottom. After filling them with some soft stuffing (from an old pillow I was about to throw out!), I gathered the stitches to shape them into cute little fabric pumpkins.
To give them more dimension and that classic pumpkin shape, I wrapped three pieces of string tightly around the outside of each stuffed pumpkin, spacing them evenly around the circumference. It added lovely definition to the shape and made them look so realistic.
For the stalks, I cut rectangles of brown felt, rolled them up tightly, and secured the ends with a dab of hot glue before attaching them to the top of each pumpkin.
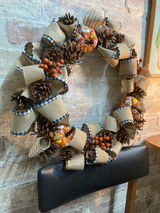
Finally, I added the pumpkins to my wreath along with the painted berries, some leftover pine cones from last year, and a few lengths of jute ribbon. The mix of textures , fabric, wood, and berries , gives it a lovely rustic look.
I’m so pleased with how it turned out. It feels warm, cosy, and perfectly autumnal and all made from bits I already had at home. 🍁
Comments